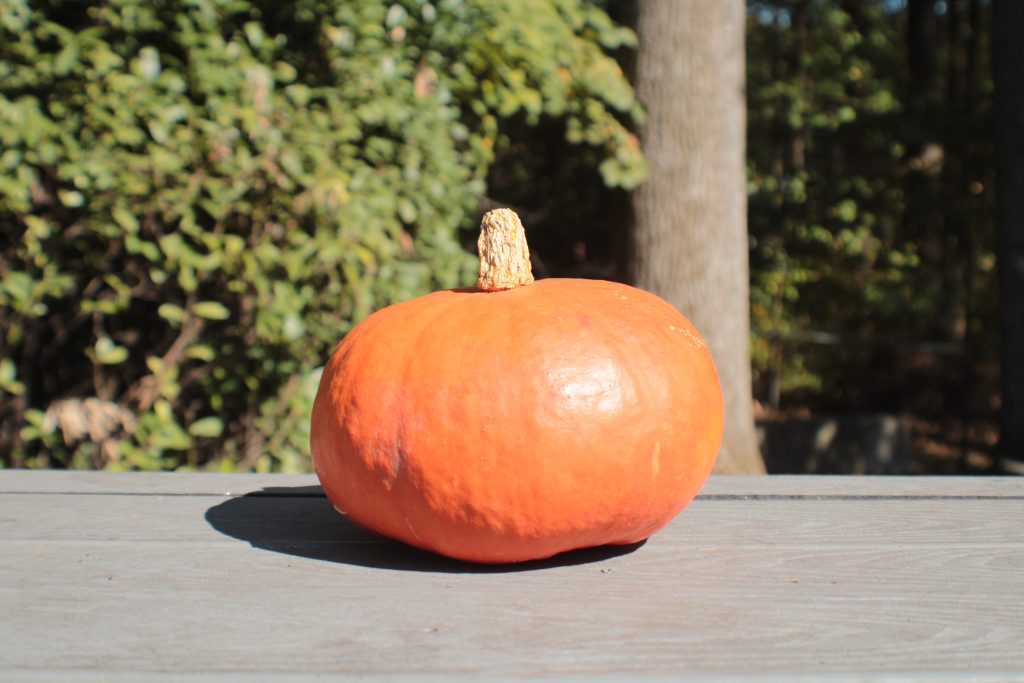
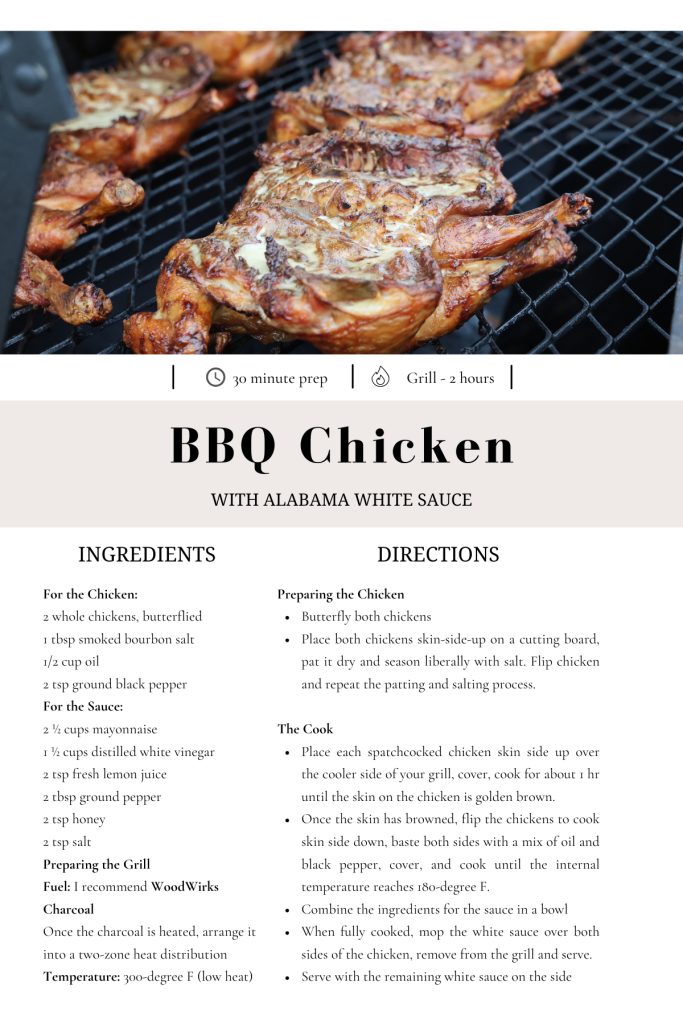
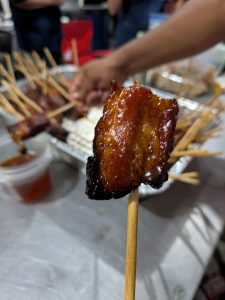
BBQ Chicken
My Interview with Woodwirks Charcoal
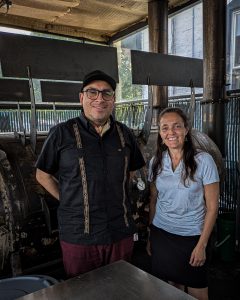
My interview with Greg Seitz
co-Founder of WoodWirks charcoal
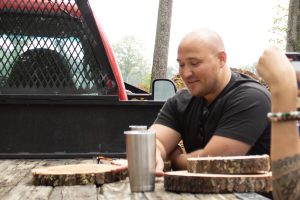
On a rainy September morning, I embarked on a 2.75-hour drive to Virginia, eager for my interview with Greg Seitz, co-founder and driving force behind WoodWirks Charcoal.
I had first met Greg about a month earlier as I entered a hardware store. The enticing aroma of food cooking over charcoal drew my attention, and I soon discovered it was a special promotion featuring WoodWirks Charcoal – an exceptional, Culinary CharcoalTM made right here in the DMV (DC, Maryland, Virginia). Although I am not a connoisseur of charcoal, I could immediately taste the difference. I knew I had to learn more about it, so I requested an interview to explore what made this charcoal unique and to write an article that would help others discover this remarkable product.
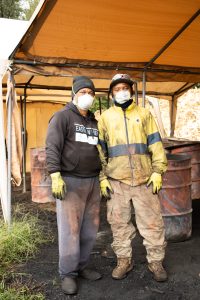
Upon my arrival, I drove down a dirt road that led me to the heart of the operation, where Greg, COO, Paddy Coker, Culinary Director, and Hilary Kline (Marketing Director) were waiting for me.
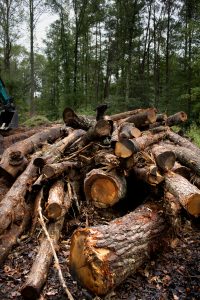
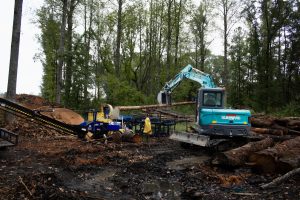
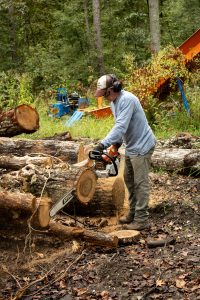
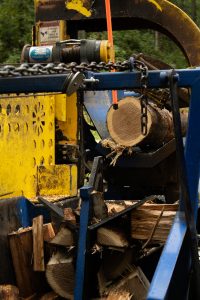
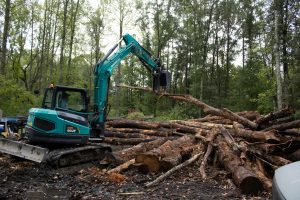
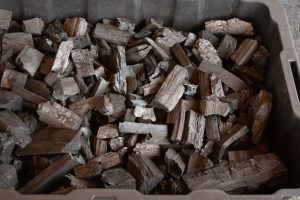
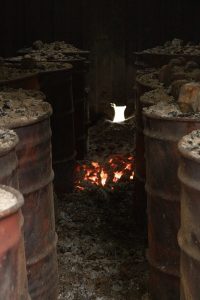
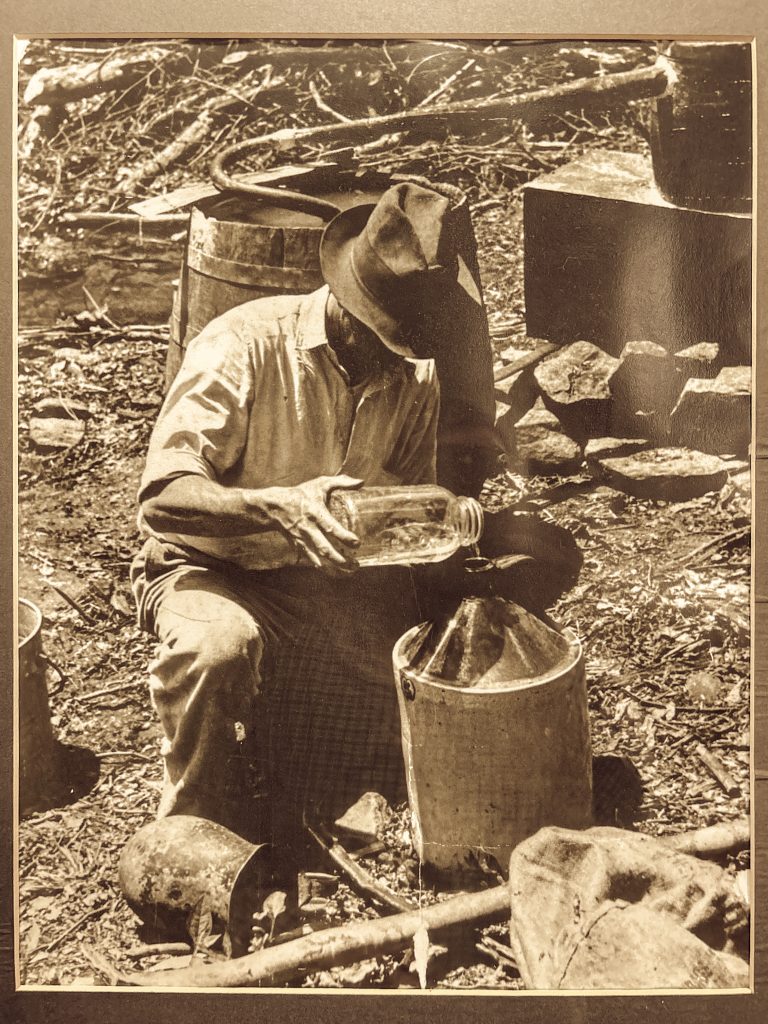
From humble beginnings delivering firewood to producing Culinary CharcoalTM, WoodWirks has evolved, grown and become an organization that every woodfired Chef or home cook should be aware of, starting with the careful selection of the best logs, followed by cutting them into smaller pieces and placing them in metal drums, which will be delivered to the final phase, where it will become charcoal.
Their story is one of passion, perseverance, and proof that when we are passionate about something, we can achieve more than we ever believed we could.
“When you think about the quality of the product that WoodWirks makes versus other brands you know there’s no chemicals involved there’s no additives or fluid put on top of the charcoal to make it light faster; this stuff is the cream of the crop and I think ultimately using that better product is better for restaurants as well because they’re going to be burning less of it and it works so well that the heat gets there quickly. I always view it as an ingredient, the same as the salt that you put on a steak; it’s a flavor enhancer, it has its unique flavor, not just charcoal flavor.” -Paddy Coker
Where it began, the origin story of Woodwirks
In February 2020, just as the world was preparing for the sweeping changes brought by the COVID-19 pandemic, Greg made a significant life transition by retiring from the software industry. Initially, he embraced the newfound free time by indulging in hobbies—playing with his cat, hitting the gym, and working on his golf game. However, as the weeks went by, his routine became mundane, prompting his wife to step in with a humorous but firm suggestion: “You need to find something to do! Just make sure it’s not within 100 yards of this house!” Taking her words to heart, Greg began helping a friend with seasonal tasks at Lake Anna, such as snow removal and yard work.
During his daily commute, he noticed a pile of firewood at a neighbor’s house and decided to investigate. After striking a deal with the homeowner, he began loading his truck with firewood each evening and delivering it to clients in Arlington. This side gig quickly took off, with Greg seeing an opportunity to earn some extra cash while keeping himself busy. As the winter season progressed, Greg depleted the seller’s entire stock of approximately 75 cords of firewood. He realized that he didn’t want to give up this newfound business. During his commute, he stumbled upon another property filled with uncut logs. Upon inquiring about them, he learned the homeowner was looking to get rid of them.
Determined to expand his offerings, Greg struck a deal: he would cut up the logs and pay per cord. This led him to invest in a chainsaw and a firewood splitter, allowing him to pivot entirely to firewood production. With a growing list of about 300 clients in Arlington, Greg quickly found himself juggling deliveries.
As winter came to an end and firewood demand began to wane, a friend encouraged him to think ahead. “What are you going to do in the summer?” he asked. Greg hadn’t considered the seasonal shift but was intrigued when his friend suggested making culinary grade from his leftover wood. Determined to explore this new opportunity, Greg conducted research and viewed instructional videos online to understand how to make charcoal. Despite living in a location that limited open flames, he devised a plan. He approached his neighbor and proposed to build a cinder block shed in her backyard for charcoal production, offering to gift the shed to her once he finished. In exchange, she would monitor the fire overnight, receiving compensation based on the charcoal produced.
Thus, from going to the gym and playing with his cat, Greg transformed his idle retirement life into a thriving business with WoodWirks. Combining passion, creativity, and a keen understanding of his community’s needs, he turned a simple idea into a venture that not only brought him fulfillment but also enriched the local economy and reinforced sustainable practices. As WoodWirks continues to grow, Greg’s journey exemplifies how seizing unexpected opportunities can lead to rewarding new paths.
The Path into Restaurants
 The path into the restaurants began when Greg learned about the restaurant Hawksmoor, a charcoal-centric steakhouse in NYC, and its focus on high-quality food. After facing rejection from another butcher shop that mentioned they would only carry his charcoal brand when restaurants successfully used them, Greg was determined to get his charcoal into Hawksmoor. Even though his wife was skeptical, he decided to mail some bags of his charcoal to Paddy Coker, head chef and butcher at Hawksmoor, hoping for positive feedback. He believed that if this restaurant liked his charcoal, then he could approach the butcher in McLean with newfound credibility. After mailing the bags, he waited for a month, uncertain about the outcome but hopeful for a response from Paddy Coker.
 Weeks passed; life at Hawksmoor was busy and unpredictable, especially since it was their first international opening in the U.S., and they were still navigating the complexities of the American market post-COVID. The restaurant prides itself on using exceptional ingredients and maintaining high standards regarding sustainability and sourcing. Initially they chose a widely used charcoal, which was considered good, Paddy was wanting something local, sustainable and higher quality.
A month later, the unexpected happened. While stuck in traffic on the Beltway after delivering firewood, Greg received a phone call from a New York number—a call he typically wouldn’t answer. To his surprise, it was Paddy Coker, the chef from Hawksmoor, on the other end. Coker informed him that he tried the charcoal and was impressed.
 Then he asked if WoodWirks could provide 600 pounds of it—a significant order that highlighted both the chef’s interest and the potential for a solid business relationship. Overjoyed but also anxious about such a large request, Greg committed to delivering the charcoal personally, rejecting the option to ship it through a delivery service. Dawn Young, co-founder, CEO bagged all the charcoal. As the week progressed, Greg found himself unable to sleep, fueled by excitement and the pressure of fulfilling this important order.
This journey highlights the trials and tribulations of introducing a new product in a competitive culinary landscape, underlining not only the determination and passion of WoodWirks but also the potential rewards of perseverance and believing in the quality of their work. The prospect of working with Hawksmoor represented a significant milestone for Woodwirk’s brand and ambition, setting the stage for further growth and success in the industry.
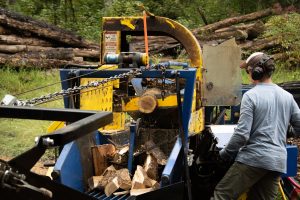
After working with Hawksmoor NY for a couple of years, Paddy had great news for Greg: Hawksmoor was expanding and opening a location in Chicago, and they wanted to use his product there as well. This opened the door to WoodWirks expansion and journey into a larger operation with new equipment and larger output. This prompted the purchase of a large woodcutter as well as a tractor to move the logs, a larger burning shed, and more barrels to fill with wood to make the charcoal.
The Charcoal flavor
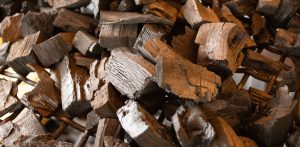
 WoodWirks sources different Virginia hardwood species, including White Oak, Chestnut Oak, Red Oak, Cherry, and Apple, to create 12 lbs bags of single-origin Culinary Charcoal. Each wood variety affects the flavor profile of the food cooked over it. In my personal WoodFired Life, I usually use Oak; if I am able to find hickory, I will use it as well. In my experience, both burn hot and long. When I asked Paddy Coker about his preference, he stated oak is his preference due to its consistent burn, “especially at the restaurant when you need that; and when you’re talking about repetition, like three, four, five hundred covers of service a day, it’s got great flavor.”
Paddy then offered some great knowledge about wood and flavor combinations. He stated that the apple has some really nice floral notes to it, and it pairs well with proteins such as fish or chicken. It has a more delicate taste to it. The cherry has a completely different flavor altogether; It has more robust notes, it imparts a sweet, earthy nuttiness to food. Great flavor, really unique.
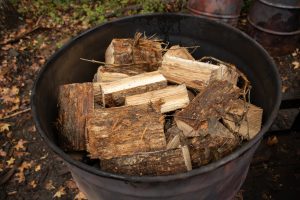
“WoodWirks charcoal is fun to look at as well, the lumps have beautiful shapes and colors when it comes out of the bags, each type of charcoal looks different from one another.” Hilary Kline
The difference between ordinary briquettes and Woodwirks Charcoal
WoodWirks offers pure hard lump Culinary CharcoalTM. They know exactly what County the trees have come from and what is in each bag, whether it be oak or cherry, or apple. Because they’re using fresh wood, the naturally occurring resin remains throughout the firing process, and that resin from the raw material, when it comes from fresh wood, is the key ingredient to those intangibles and those spices that Paddy explained.
“When you spend money on a quality cut of protein, whether it be chicken, fish, or steak, you don’t want to put it on a five-cent fuel. You want to put it on a fuel that’s going to enhance your experience. You want your protein to be enhanced, and you want that to be part of your meal experience. This unique flavor won’t be achieved with a large bulk manufacturer of briquettes.” Greg Seitz
How to use Woodwirks Charcoal
“I recommend you have fun trying all of it”. Paddy Coker
Anyone who loves cooking with fire has probably smoked protein; smoking is great, but there is a time and place for it. However, when you want to grill some steaks, that intense smoky flavor isn’t what you want. You really want to feel the beautiful flavors of the beef coming through, particularly if you’re grilling something like a filet or a ribeye that costs a lot of money. High heat, high temperature, is better for getting a nice golden sear.
Try mixing it out as well, try new and innovative ways to cook, create your own style. Find what you enjoy the most and enjoy cooking over it.
Many cooks also try new and innovative ideas. Greg knows of a baker who won a competition in Ohio after smoking a cheesecake with their Cherry Charcoal, and a pastry chef at Cordelia Fishhouse in Washington DC who uses the charcoal to smoke some cornbread for an ice cream dish. I’ve found many people who are keen on cherry charcoal because of how clean it burns and the hint of sweetness that it imparts to what they are cooking. Not many people bake on charcoal.
Life Fire Cookery is a very hard skill to master it may take years. You have to learn how to play with the elements. WoodWirks is helping chefs at Michelin-starred and James Beard-awarded restaurants elevate their cooking and their creativity. Woodwirks’ goal is to educate and show that their Culinary CharcoalTM is several steps above the mass-produced charcoal and ultimately help people enjoy their grilling experience.
“When you lay some pork chops or some shrimp, or wilt some lettuce on your grill with a good cocktail at the end of the evening, I want WoodWirks to be a part of that experience. We believe we make a quality product that does just that.” – Greg Seitz
Next for WoodWirks is the expansion of their production capacity while continuing to upgrade and elevate the quality of what they are doing. WoodWirks will not jeopardize the quality in order to make more. That’s why Paddy is part-owner, because his culinary expertise in charcoal makes him a really good quality control officer as we grow or add more varieties.
 WoodWirks also offers smoking products for mixologists and for electric smokers that would be used in a restaurant. They are really fine, top-grade shavings, created for mixologists and for electric smokers. When smoking spirits and other cocktails, mixologists should always look for natural products; these will enhance the flavors, not hide them.
WoodWirks has a small team of dedicated individuals who believe in the vision of the company and are vested in their success.
From sustainably sourcing the best quality logs, to delivering the final product, it’s obvious to me that WoodWirks is not just making a product, they are creating an experience for everyone who comes in contact with them, whether it’s at a hardware store during a promotional event or a world-renowned restaurant, a home cook or a live-fire event, WoodWirks is here for their customers and for the consumers final experience.
Where to find WoodWirks Culinary CharcoalTM

You can currently purchase WoodWirks Culinary CharcoalTM at various butcher shops and at ACE Hardware stores within the DMV. As the company continues to grow, WoodWirks will become available at all ACE Hardware stores nationwide.
For a detailed list of current retailers carrying WoodWirks Culinary CharcoalTM, please visit their website at https://www.woodwirks.com
Overnight BBQ Bootcamp
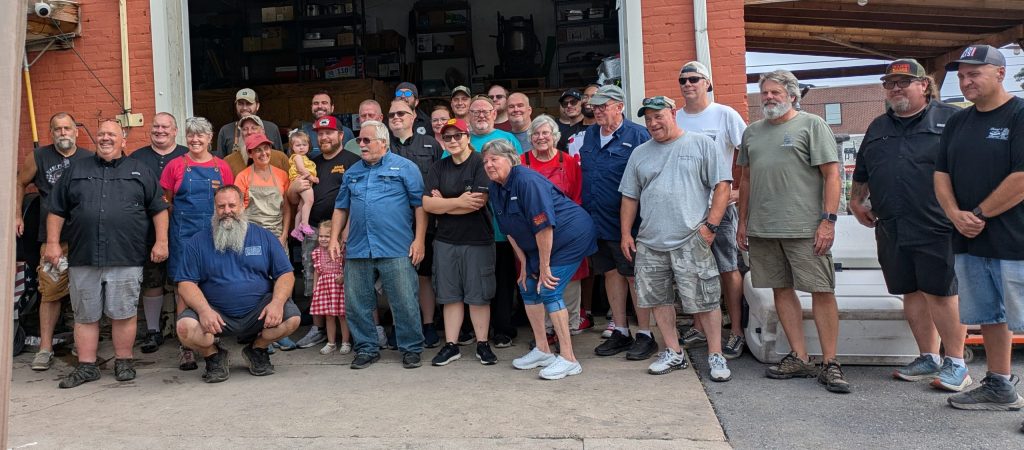
It was Friday evening, as a group of strangers began gathering in Greencastle, PA at Mason-Dixon BBQ for the first overnight bootcamp of the season, 25 students and instructors would be smoking 28 Pork Butts and a whole Hog!
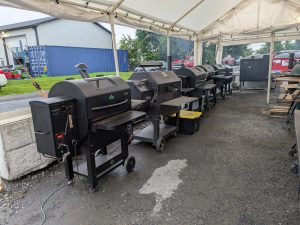
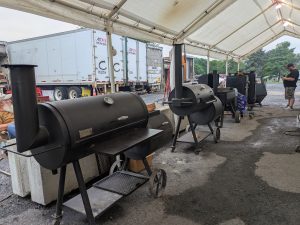
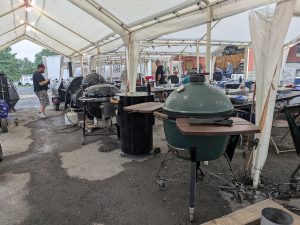 If you are wondering how this is possible, we had about 25 smokers, some pellet smokers, some big green eggs, some offset woodfired smokers… it was an army of smokers just for us! We could each pick what we wanted. I chose the offset woodfired since it was the closest one to my smoker.
We began with dinner, a tortilla burger like none I’ve ever had, accompanied by corn, apple cobbler, and strawberries, my mouth waters just thinking about it again. After dinner, it was time to begin. We were divided into groups of 4 (please note, group #1 was and still is the BEST!) and taught how to appropriately prep a pork butt, “backyard” style and “competition” style. We learned about the money muscle (known by this name because, once cooked, it is moist and tender; it’s what wins checks and trophies in BBQ competitions), the tubes, and the horn.
After learning these basics (it was anything but basic; lots of details were shared), it was our turn to demonstrate what we had learned. We each prepped our pork either way we wanted. I chose competition style. Looking back, I probably would have placed pretty far back in a competition since my money muscle-cutting skills were somewhat lacking. We injected our pork with randomly selected rubs and injections. Mine was the Blues Hog Pork Injections with Apple Juice as the liquid and the Sucklebusters Competition Rub. Once prepped, these went into the fridge for a couple of hours before placing them in the smoker for several more hours until our 205° temperature was reached (190° for the money muscle).
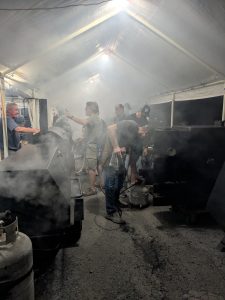
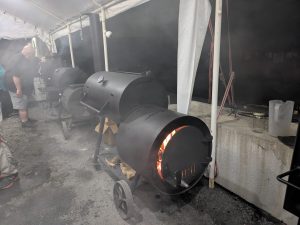
Starting our smokers was one of my favorite moments: the smoke, the organized chaos, searching for wood, starting chimneys, placing charcoal, filling the pellet smokers, learning about a new smoker you’ve never used before, and most of all, the camaraderie of helping each other. Watching as the “dirty smoke” switches to a clean burn and finally, placing our pork shoulders.
So, you may be curious about what is done during an overnight camp while our pork is smoking. For starters, make sure your fire is burning at the right temperature throughout the night. I am proud to say mine sustained the temperature throughout.

I checked on it about every 30-45 minutes. Several logs were added throughout to maintain temperature as well as allow the proper air flow.
During the evening, nicknames slowly manifested; we were surrounded by Texas, Number 11, Quiet, Birthday Boy, Maryland, Pappy, Ira… just one way to remember who was there.
We also ate a lot. We had tri-tip, sourdough pastry, chicken wings, candied pork belly, nuts, cookies… everyone helped in the preparation of the overnight meal. We never had a moment where we sat idle (unless you needed a quick catnap).
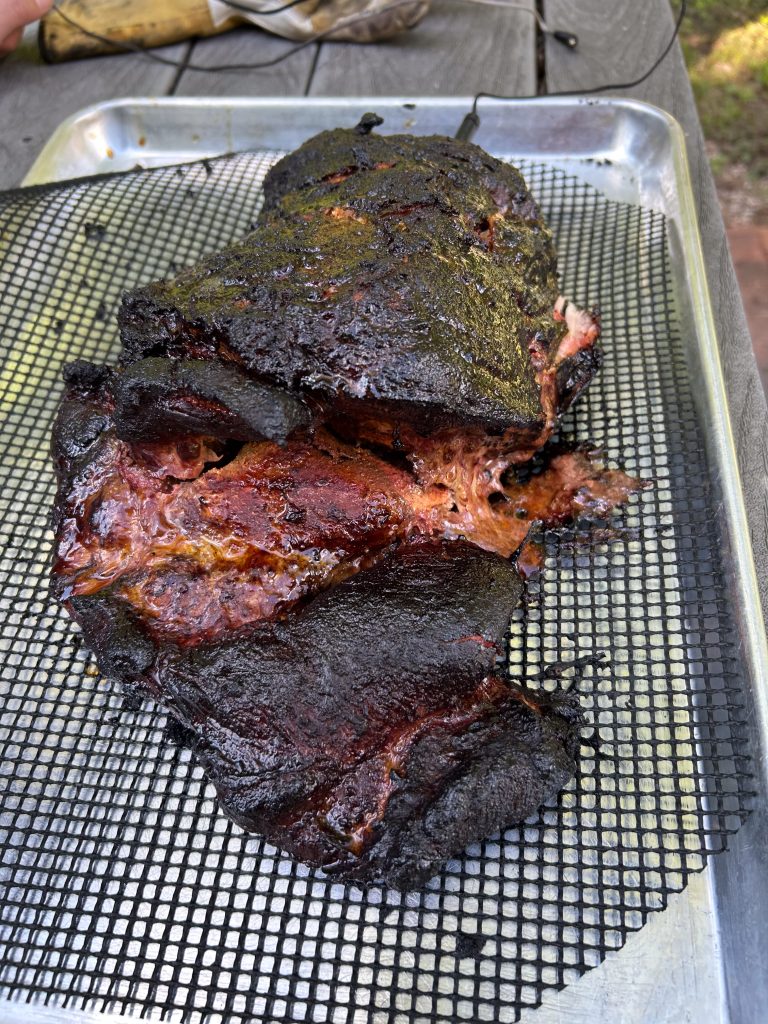
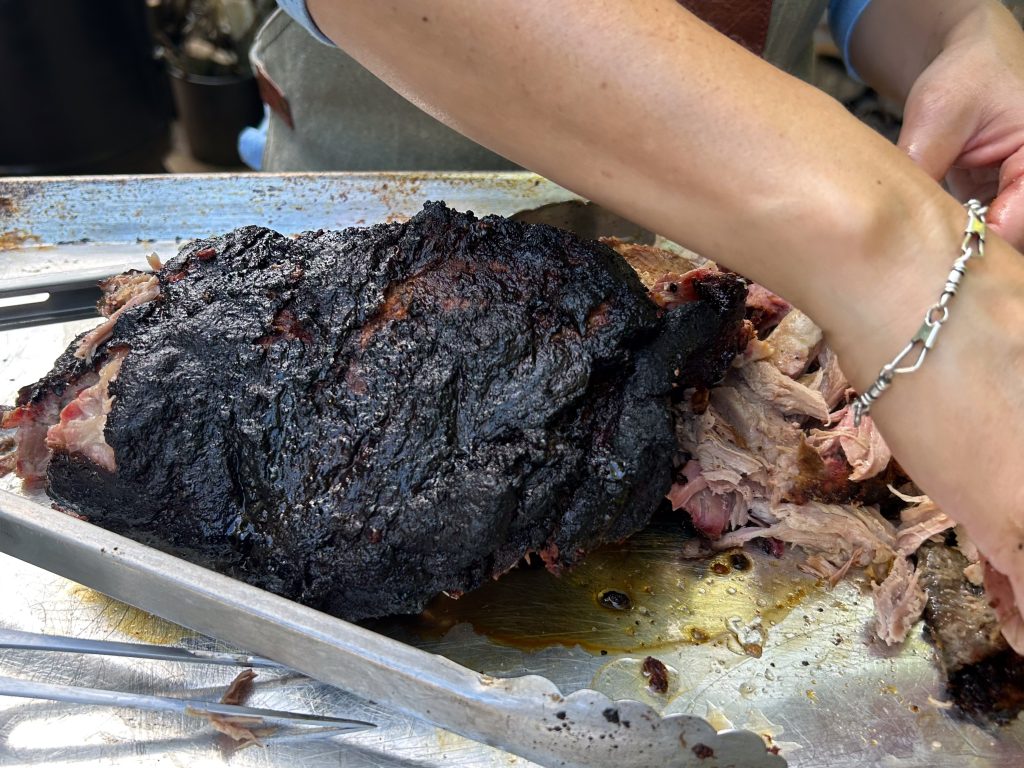
When morning came, we, of course, were very hungry, so we prepared breakfast, then finished our pork and hog, and tasted it!
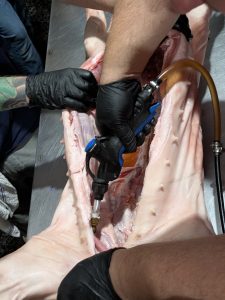
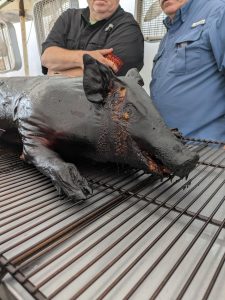
One of the reasons I wanted to take this class was simple: I wanted to have an opportunity to smoke a whole Hog. Not just a pork shoulder or brisket, ribs or bacon, but the whole thing, the type of smoking the pros do, I wanted to be able to say “I smoked a whole Hog!”
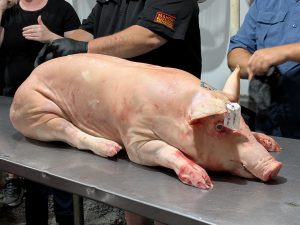
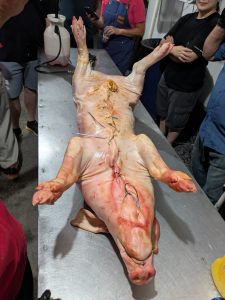
Tradition says that when you cook a whole hog, you must name it. Ours was named “PoppaDon”, although once we laid eyes on her, it was clear we should have named her “MommaDonna”, but that’s OK, she didn’t mind.
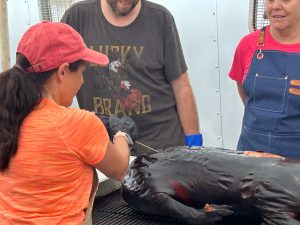
As you can see in the photo, we were even able to get a smile out of her

When preparing a whole hog, it’s essential to determine the ideal position you want it to cook in; once it’s in the smoker, no changes can be made without risking damage. Ours was set up for presentation -in a sitting position.
The next step is to inject it to keep it moist, and then sprinkle a generous amount of rub. Since our hog was going in a sitting position, we stuffed it to help with moisture retention. We used chicken thighs and breasts as stuffing, then sewed it to keep everything inside. (like a BBQ Build-a-Bear!)
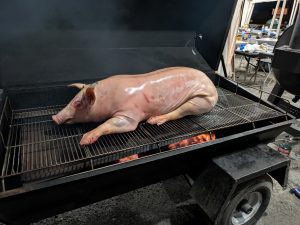
Once prepped, she was placed in the smoker, where she remained until morning. It’s never a “set-it-and-forget-it” process. At one point, she had to be pulled out to take care of the excess heat and fire in the smoker. She got a little “caramelized” (or slightly torched, depending on your point of view), but it was just the skin; all the wonderful meat inside was cooked to perfection.
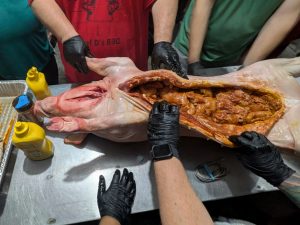
In the morning, after a much-needed coffee and breakfast, we learned about carving the hog. I managed to say “ME” first and had the honor of slicing her open; it was easier than I thought -I expected the skin to be hard, but once punctured with the tip of the knife, it was soft like butter, except for a small stubborn portion of the skin in the ham.
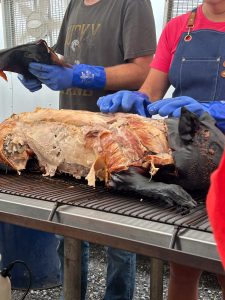
The cut ran between the shoulders, all the way through the butt, loin, and ham, then down from the shoulder to the jowl and in the back, from the rump down the ham. She was then pried open and the meat exposed, then the pulling of the pork meat began, as well as the chicken meat we had placed as stuffing. We all had a chance to taste and bring some leftovers home.
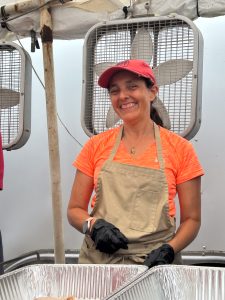 We were “Happy Boot Campers”.
I cannot say enough about this experience; it was rich with information, packed with a team of people who clearly love to prepare BBQ, everyone, from our instructors to the students, was a joy to be around. I hope to be able to participate in another Bootcamp and learn even more about this craft I love.
Thank you MASON DIXON BBQ SERVICES.
@masondixonbbqservices
Written by: Vanessa Nino
www.platedpix.com or @plated.photography1
Moonshine and Memories: The Tale of the Begley Family
My interview at 2Fifty Texas BBQ
What first sparked your passion for barbecue, and how did that evolve into becoming a pitmaster?
Fernando’s barbecue journey began in the most unexpected way: a movie night back in El Salvador. He was still working as a civil engineer when he saw Aaron Franklin tending a massive smoker in the film Chef. That image stuck with him.
The questions that followed would certainly change the course of his professional life. How are these guys cooking in these gigantic smokers? Why’s the food wrapped in butcher paper? What even is a firebox?” he recalls. “Coming from a place without any barbecue culture, it sparked this obsession.”
3 years later, he made his first trip to central Texas, originally a short trip, turned into an added 3-day barbecue pilgrimage to some of the most influential barbecue locations in Texas, then, on his return home, with his wife Debbie’s blessing, building his very first smoker from a repurposed 135-gallon propane tank—right in his living room.

How does your Salvadoran heritage influence your approach to barbecue?
From the start at the farmer’s market, to their current location “some of our roots were there since day one” It’s not loud or flashy, but it’s there—showcasing a delicious variety of Salvadorian and Latin American dishes such as platanitos fritos, entraña in the house-made beans flown in from Central America, in the bright tangerine salads, and to my delight, buñuelos—Colombian-style.
“We know we can do great Texas-style barbecue… but the sides?
The sides can’t be an afterthought.”
What does a typical day look like at 2Fifty?
With his team of 59 people, the day starts early and runs deep. Fernando might say it’s “boring right now,” but the rhythm of his day is anything but boring. From planning menus and tasting proteins to checking deliveries and visiting the on-site garden, he has his work cut out for him.


Menu’s are seasonal and planned one-month in advance “We were born in the farmer’s market, that shaped us,” he says. “We still work closely with farmers. We don’t source commodity proteins. Everything we use is locally and ethically raised.”
“We’re not just running a restaurant—we’re trying to work as an ecosystem.”
Everything at 2Fifty is personal. Every ingredient, every fire, every plate. He saves his closest focus for the proteins. “I stay hands-on
with the barbecue. I like to taste throughout the day—brisket, whole hog, ribs,
turkey. I move through them all, just checking quality. But I’m also really
mindful of barbecue fatigue,” he says, smiling. “It’s real. You have to pace
yourself.”
Tell me about your smokers.
Fernando lights up when talking about his smokers.
“We have two primitive pits, both 1,000-gallon,” he says. “They’re great for short cooks—anything in the four- to six-hour range.”

Then there are the stars of the show: the Mill Scale pits. “We’ve got two of those as well—also 1,000 gallons each. They’re what I call the Cadillacs of brisket,” he says proudly. “They came all the way from Lockhart, Texas. And we load them with 100% briskets. All day, every day.”

“We also have one M&M rotisserie—a 1,000-gallon wood-fired smoker. No gas,” he adds quickly, with pride. “And then there’s our direct-heat setup, a Santa Maria-style grill, also from M&M. Again—all wood.

He speaks about the smokers the way an artist might speak of brushes. Each has its own function, its own place in the rhythm of the kitchen.
How do you choose your meats and butchers?
Every cut of meat has to meet the highest standard: prime-grade, ethically sourced, and flavorful. There’s no room for compromise.

He’s candid about the business reality. “Honestly, it’s not the wisest financial move. Not on paper. Restaurants that run protein-heavy menus—like we do—are already dealing with thin margins. Add on ethical sourcing and premium grading? You’ve got to run high volume just to keep it sustainable.”

But quality wins, every time. “We don’t cut corners. We won’t. Because this food is a reflection of who we are.”
He gives full credit to the person who makes the balance possible. “That’s where my wife comes in. Debbie’s the mastermind behind our financial strategy. She’s third-generation in restaurants. She’s the one who makes it all work.”
What makes 2Fifty stand out in a field crowded with Texas-style barbecue?
Fernando doesn’t believe the Mid-Atlantic is crowded. Instead, he saw a space full of curiosity and craving for something real.
“What we found was that our community here was ready. Ready to move past commodity food.”
Tell me about your wood.
Wood is fuel, yes—but it’s also flavor. 2Fifty uses 100% oak, aged for about 1 year, sourced from a family they trust – the Prince family.
Clean combustion isn’t just a technical term—it affects everything. “If you don’t get it right, you get creosote buildup in your pits. You get dead smoke. It affects flavor, texture… everything.”

What are you most proud of?
“We were named this year semi-finalists for the James Beard Award,” the team shared with immense pride. “It means a lot because it’s way beyond food. It’s about sustainability, it’s about advocating for others, for yourself. It’s about educating yourself on how to use your voice for things that matter to the rest of the industry. It’s about climate survival, it’s about the relationship with farmers.”

“I really appreciate that we were selected as semi-finalists because that means we’re doing something not only from a menu or a business perspective, but way beyond that.”
What’s the toughest challenge you’ve faced?
“I think keeping our doors open is pretty challenging right now,” he admitted. “As we speak, we’re facing probably one of the highest records in history when it comes to beef prices, and operating a Texas-style barbecue, beef prices are directly impacting our operations.”
How do you train your team to maintain consistency?
Training is constant—hands-on, immersive, and uncompromising. They even fly in pitmasters to train the team, as well as sending their team off to Texas for more hands-on experience. And they’ve chosen not to franchise because consistency matters more than scale.

“The moment Debbie and I can’t be here every day… we disengage from the experience.”
What was it like teaching barbecue in El Salvador?
The response was overwhelming. Texans and expats living abroad missed barbecue—and Fernando delivered.
Despite early challenges, the passion for barbecue shone through. “We were selling out. We were selling out every single weekend. And probably the barbecue was not that great back in the day. One because of sourcing. Secondly, because I was still learning, I’m still learning, but I was learning on really basic stuff. I didn’t have access to a consistent amount of wood or a protein that I was 100% happy with.” Yet, the experience underscored barbecue’s unique power:
“Barbecue has the power to sit people down at the same table.”
Are meat cuts in El Salvador the same as in the U.S.?
“That’s a very good question,” he responded, highlighting the complexities of sourcing. “I was able to source pretty good locally sourced chicken. I was able to make my own sausages, and I was going to one of the biggest markets that imports goods from the United States to source my spare ribs.”
However, brisket presented a significant challenge. “Brisket was non-existent. I had to go to a specialized butcher in the west side of the country so he could cut some brisket especially for me, and even then, they were so lean, there was barely any fat in there.”
Are you teaching barbecue here?
“Yes. We’re gonna have our first barbecue class” he enthusiastically announced. “It’s a partnership we’re doing with Skillette Cooking Academy in DC and us.”
Any surprising ingredients you love to use?
“I can’t think of one in particular,” He began, “What I can say is how pungent our greens are that we grow in house. It might be surprising for some people.” Fernando attributed this to the quality of their produce. “You know why? Because if you go to the supermarket, chances are, they put all kinds of stuff in it. And the soil where that vegetable comes from is 100% not the same soil as what we are growing ourselves. So, our parsley, is pungent, because we’re growing it and washing it and serving it probably the same day. And you can’t beat that freshness.”

The farm-fresh greens and onions they grow and source locally are incredibly vibrant.
What did you learn from Francis Mallmann and Aaron Franklin?
He explained how Mallmann’s approach contrasted with common perceptions of fire: “When you think about fire, it might sound something really violent and something really intentional and something really aggressive, cooking with fire, but it was quite the opposite, learning from him and listening to him and seeing how he moves around fire. Surprisingly for me, his most repeated word, ‘fragile’—’This is fragile, the fragility of smoke, the fragility of the fire, the fragility of the embers.'”

Transitioning to Aaron Franklin, they humorously stated, “Aaron Franklin… if Francis Mallmann is all about romance, romance with fire, then Franklin is all about rock and roll. It’s rock and roll and fire and smoke.” He was particularly impressed by Franklin’s adaptability: “It was very interesting to see how he was navigating in Argentina, this happened in Mendoza, Argentina, so looking at him, how he was pulling tricks and pulling a different card on how to make this Argentinian cattle that he is not used to cooking, in a completely different environment and a different altitude with completely different wood, different humidity, and still able to produce an amazing brisket. That was something special.”
“Every fire is different. Every cook is different. Leave room for surprise.”
What advice do you have for home cooks?
He stressed the importance of patience, especially with live fire cooking. “You can char, sear and smash and create a Maillard reaction, super hard, super fast, super hot, but the preparation to get to that point is also very long when it comes to getting your wood, thinking what chop are you going to use or what kind of grill are you going to use. And then building that fire the way you build that fire, how much time you need to get that plancha or that stove top or that chapa or whatever you’re using to that point. There’s a long prep to get to that point, and that also really needs a lot of patience.”
Don’t rush. Treat each cook as a learning experience. Fire takes time and patience—but it rewards you if you let it.
“You’ll never know everything about fire—and that’s what makes it so beautiful.”
What dish is closest to your heart?
Vegetables cooked directly on the embers. Simple. Honest. Transformative.
“Don’t overcomplicate it.”
How do you want guests to feel after eating at 2Fifty?
Like family. Like they’ve been invited into something warm and meaningful.
“Welcome to the family. That’s what barbecue is really about.”
I can honestly say, I felt welcomed and a part of the 2Fifty Family, Thank you Fernando and Debbie for making time for me, to the whole 2Fifty Staff, thank you for your smiles, your storytelling, and your passion for what you do.

The Flambadou

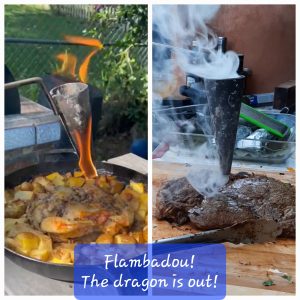
A Fiery Tool of Culinary Tradition: Why I Fell in Love with my Flambadou
When I cook with fire, I’m not just aiming to feed—I want to wow my family and guests. I want every bite to feel rustic yet elevated, and completely unforgettable. That’s why I’m obsessed with my flambadou.
Never heard of it? Neither had I—until I stumbled upon it while listening to The Wood Fired Oven Podcast (Season 1, Episode 3, shoutout to Mark Goston!). The way he described this medieval-looking iron cone had me hooked: “the cool part happens as the [fat] drips meet the air, it ignites and drizzles onto the meat while sizzling like crazy… a bit of a crowd pleaser removing the literally glowing cone from the embers on a dark night looks spectacular. And then when the fat starts igniting and sizzling onto the meat, it’s just amazing.” Who wouldn’t want to try that?
What Exactly Is a Flambadou?
Traditionally used in French cuisine—especially in regions like Gascony—the flambadou is a cone-shaped iron tool designed to hold and heat fat over an open fire. Once it’s blistering hot, you drop in a chunk of lard, suet, or any solid fat, and it instantly melts and ignites. Then comes the fun part: you tilt the flambadou over your selected food item and let that flaming fat cascade down, searing and basting it all at once. It’s pure culinary theater.
“It’s like a dragon breathing fire onto your dinner. Yeah, it’s kind of like that.” (Fine Dining Lovers, 28 June, 2019)
My First Taste of Flambadou Magic
My very first flambadou was a gift from my parents—one of my earliest “fun” fire-cooking tools. I still remember how my family and I reacted when I lit it up for the first time. It wasn’t just about the flavor, it was about the magic it created that evening. It turned my cooking into a show.
I felt the heat, heard the crackle of the fat, and saw the ignition of flame; the result? Perfectly seared, flavor-packed meat with a crispy edge, I can’t do that on my own (my mouth is watering as I write this!).
My Flambadou is made by Forged, they state the following on their website “with fire, sizzling fat and a fiery show, you not only create a taste explosion, but also an experience you will never forget.”
For me, the flambadou isn’t just a cool gadget—it’s how I combine my passion for cooking with fire and my love for entertainment. It’s great to use a centuries-old tool that gives me goosebumps whenever I use it. It connects me to the roots of cooking, while delivering some fun drama to my cook.
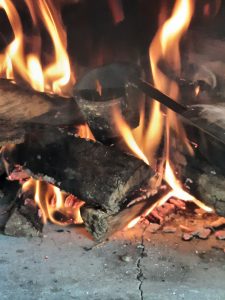
Cooking over live fire is more than just a method; it’s an inspiring journey. There’s an undeniable thrill in discovering new techniques and an unmatched satisfaction in finding tools that elevate the experience. Ultimately, it’s about crafting those priceless, magical moments around the flames that you’ll cherish.
Smoking
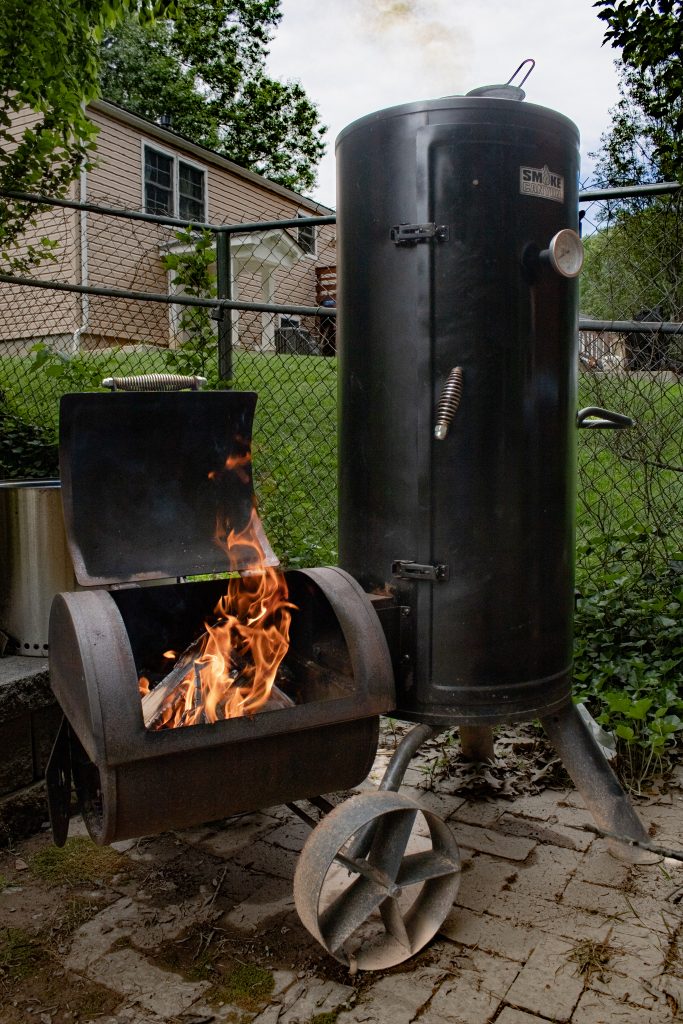
This vertical smoker is my newest wood-fired acquisition—and an exciting addition to my outdoor kitchen.
I didn’t grow up smoking meats, nor do I have family members who passed down
their secrets. Still, I felt compelled to dive into the world of smoking and make it part of my cooking repertoire.
A Diamond in the (Rusty) Rough
We found the smoker secondhand, and it needed serious TLC. I rolled up my sleeves and got to work—scrubbing off years of built-up grime, tackling rusted areas, and restoring it to working condition. It was certainly a labor of love.
From there, I dove headfirst into learning—reading articles, watching tutorials, and soaking up every bit of smoking wisdom I could find. I found Michael Symon’s Playing with Fire cookbook one of the most inspirational and one I return to often.
My first cook was brisket, I know what you are thinking… are you crazy? well, maybe, managing the heat was by far the most challenging part, but I was proud to keep the temperature steady for the entire duration. The end result wasn’t perfect, but it was promising—and incredibly rewarding.
I especially like this vertical smoker because of its space efficiency. It fits neatly into my wood-fired kitchen and features multiple shelves, allowing me to cook large quantities of food without taking up too much room.
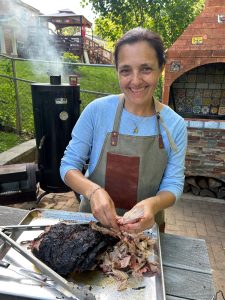
This is a recent photo of me after smoking a Pork Shoulder Butt
What’s Next: BBQ School and a Whole Hog
To continue improving my skills, I will be taking a BBQ class this summer which includes smoking. I’m hoping to pick up some insider tips and tricks—and of course, I’ll be sharing plenty of photos and lessons learned.
One of the most exciting parts? We’ll be barbecuing a whole hog. Yes, you read that right. Don’t be surprised if you see a new 4-foot-deep, 4-foot-high, 5-foot-long (1.2m x 1.2m x 1.5m) structure appear in my backyard sometime soon!
A Taste of Brazil: My unforgettable Churrasco Experience
In 2023, I traveled to Brazil with my family. One of the memorable food highlights of our trip was enjoying an authentic Brazilian Churrasco at my aunt’s home—a feast lovingly prepared by a professional Churrasqueiro named João.
 My Parents with Churrasqueiro João
A Hands-On Lesson with a Churrasco Master
Before we even arrived, my uncle had arranged a special surprise. João not only grilled for us, but also gave me a private lesson on traditional Brazilian grilling techniques. For about two hours, I stood alongside him as we prepared a mouthwatering lineup of meats and grilled fruits.
We cooked:
- Chicken hearts (a Brazilian delicacy!)
- Sausages
- Juicy pork and beef cuts
- Chicken
- Whole grilled pineapple
 Our Churrasqueira in Action
A Full Cultural Experience
No Brazilian barbecue is complete without music, and we had an incredible soundtrack of Batucadas, Samba, and Bossa Nova playing throughout the day. It added so much energy and authenticity to the entire experience.
Meanwhile, my husband crafted Caipirinhas, Brazil’s national cocktail. He learned how to make them during our first trip in 2008, right after we visited a Cachaça distillery with my uncle. Naturally, we made a stop there again during this trip—because some traditions deserve to be relived.
 At home in my own Churrasqueira
RECIPE: Grilled Picanha Steaks
Recipe by: Vanessa Niño
Picanha, also known as rump cap, is a favorite cut in Brazilian cuisine. Its thick fat cap helps it retain juiciness and imparts an unbeatable flavor. I found a beautiful Picanha roast at a local Brazilian store (sourced from Australia!) and put everything I learned from João into practice at home.
Ingredients:
- 1 Picanha roast, sliced into 1.5-inch steaks (about 3.75 cm)
- Maldon salt or Kosher salt, to taste
Preparation:
- Slice the Picanha roast into 1.5-inch steaks. Fold each steak in half into a C-shape, with the fat cap on the outside.
- Skewer each piece through a metal espeto (Brazilian skewer).
- Heat your grill to 500°F (260°C).
- Grill the skewers, flipping every 2–3 minutes to ensure even cooking.
- Cook to your preferred doneness—medium-rare is my go-to.
- Let the meat rest briefly, then slice directly off the skewer for an authentic Churrasco experience.
Staying Connected Through Food
Since coming back home, I’ve continued experimenting with Churrasco techniques and remain in touch with João. We often exchange recipes and ideas over Instagram—proof that food not only brings people together, but also keeps them connected, no matter the distance.
I’m already dreaming of our next trip to Brazil, where I’ll proudly show my family how far I’ve come since that unforgettable day by the grill.
Até logo, Brasil. I’ll be back soon!
My Churrasqueira

What Exactly Is a Churrasqueira?
(And Why You’ll Want One for Your Next BBQ)

If you’ve ever stumbled across the word Churrasqueira and wondered what it meant, you’re not alone. At first glance, it might sound like another name for a Santa Maria or asado-style grill—but it’s something a bit different and incredibly special.
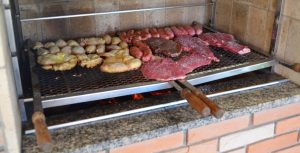
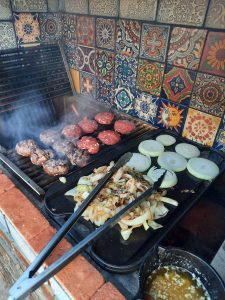
A Churrasqueira is a traditional wood or charcoal brick grill, most commonly found in Brazil. Unlike some complex grill setups, this one keeps things refreshingly simple. It’s easy to configure for both direct and indirect heat, and adding more charcoal or wood mid-cook? No problem at all.
Now, let’s talk about the real magic: the Churrasco. That’s what Brazilians call a barbecue party, and the Churrasqueira is the star of the show. Skewers are the go-to grilling method—sometimes they’re rotated by hand, other times with a motor, but always with mouthwatering results.
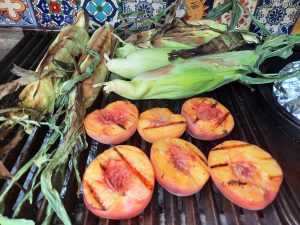
The variety of meats you’ll find sizzling over the flames is enough to make any carnivore’s heart race: juicy cuts like Picanha (the iconic top sirloin cap), spicy sausages, tender chicken hearts, fall-off-the-bone ribs, and flavorful pork, all seasoned simply with salt, garlic, and fresh herbs. Fresh fruit is always a great addition to the grill, think pineapple, peaches or even strawberries.
And of course, no Churrasco is complete without a cold caipirinha or an ice-cold beer in hand. These aren’t just beverages—they’re part of the tradition.
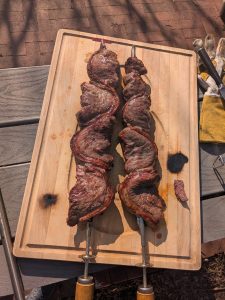
Personally? I have a soft spot for skirt steak. Just a touch of salt, a blast of fire and smoke, and it’s absolute perfection.
So next time you’re thinking about firing up the grill, consider embracing the Brazilian way—with a Churrasqueira and a table full of friends. Trust me, you’ll never look back.